
Perhaps you run a charity and want to offer your visitors a way to donate on a regular basis. Or maybe you operate a club and are looking for an easy way to collect membership dues. Or do you run a store and want to offer the option of easy payments? If so, a recurring payment form is what you need. Recurring payments are sometimes referred to as subscriptions. Use whichever term makes the most sense for your use.
You have the option to enable account creation, which would make purchases easier for returning customers. The GoCardless customer reference is then stored in the user profile, saving the need to create a new Direct Debit mandate each time.
UK users: check out Instant Bank Pay with Recurring Payments as an alternative to Recurring Payments, and get paid faster. The first payment is taken by Instant Bank Pay and subsequent payments are taken at regular intervals by Direct Debit.
Create a new form and save it. We’ll add some fields later. In the form settings, select GoCardless and add a new feed.

Then, from the list of actions, select Recurring Payment.
The feed name is auto generated; you can change it if you wish, it just needs to be unique.
Enter a payment description. As this will appear on GoCardless emails, it should be meaningful to the customer, reminding them what the payment is for (maximum 255 characters).
If the transaction amount will always be the same for this form, enter this amount. (The currency applied will be the default currency selected in the Gravity Forms settings. You should not try and mix currencies on different forms.) There is no need to add a currency symbol. e.g. for £25.59 enter 25.59
If the transaction amount will depend on form entries, leave the amount field blank.

Save the feed. We will revisit this once we have added some fields to the form.
Adding fields to your form
A recurring payment form can be as simple as a button labelled “Subscribe”. Or it can contain as many fields as you like, spread over several pages. Generally, you’ll add fields to your form and then map them to their function in the feed settings of your form.
If all you need to do is set up a recurring payent of a fixed amount, continuing indefinitely, you don’t need to add any fields to your form. You only actually need a Submit button, which you can tailor in the Form Settings.

Of course, you probably will want to add various fields. Here are our recommendations.
Product fields and a Total field
The Gravity Forms form editor provides a group of fields called Pricing Fields. Adding these to your form brings you tons of flexibility to describe your product, add quantities, the option of a user-defined price (great for donations), tiered prices, shipping and more.
If you also add a Total field (it’s recommended that you do), this will contain the sum of all amounts from the product fields.
We’ll set up this form to take a monthly subscription.

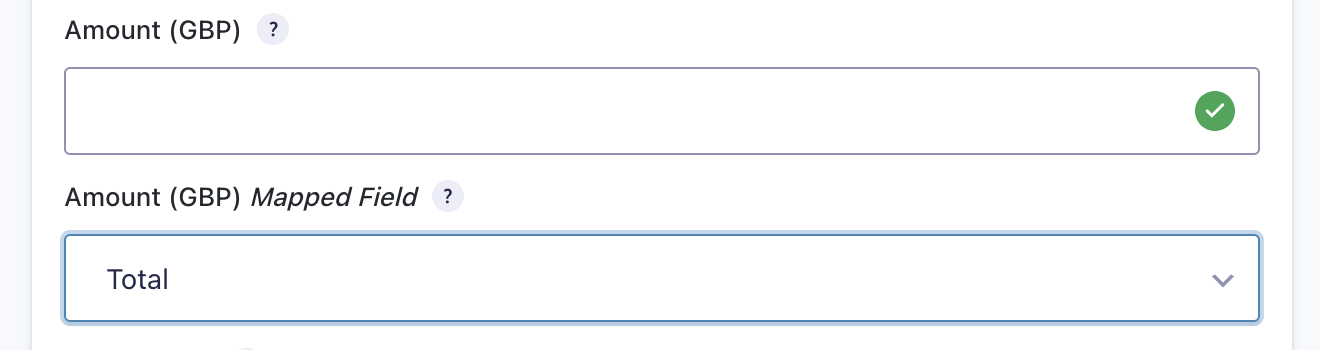
Returning to the feed, we’ve left the Amount blank and used the drop-down selector to map the Amount to the Total field. The amount in this Total field will be validated against the transaction minimum and transaction limit defined in the Gravity Forms GoCardless settings and when the form is submitted, this amount will be submitted to GoCardless for processing.
If you’d prefer to offer the customer a set of fixed choices, perhaps to accept regular donations with suggested amounts, you could change the field type of your product field to use selector buttons or a drop-menu menu instead, like this:
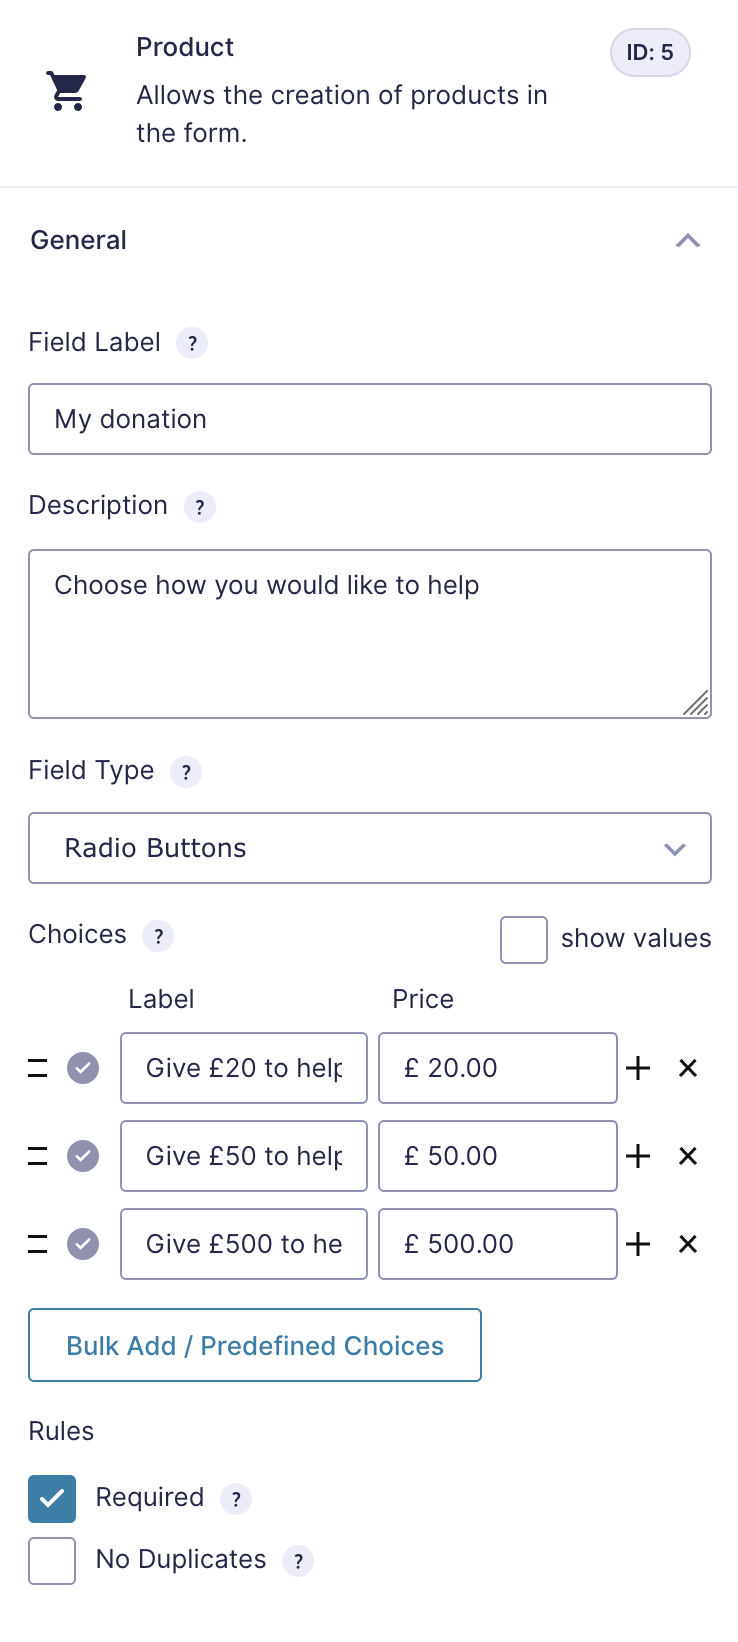
This will create a payment section field like this:

Recurring
The interval between payments can be on a weekly, monthly or yearly basis and also at set intervals of these. For example, every 6 weeks or every two months. You can select these values from the feed settings. Alternatively you can map a field on the form for the user to select the interval (weekly, monthy or yearly only).

To set this up, add a drop-down field to your form and, on the General tab, add the labels and values to the Choices area as shown. The labels can be what you like (e.g. the same but in a different language), but the entries in the Value column must be exactly as shown – ‘weekly’, ‘monthly’ and ‘yearly’. (These values also apply if you choose to use radio buttons.) If you don’t want to offer one of these payment options, just delete that choice.
Number of Payments
The number of payments can be set on the form feed, mapped to a number field on the form itself, or not specified. If the number of payments is fixed, enter the number of times the payment should be taken. To allow payments to be taken indefinitely, select Continuing until further notice.

The number of payments cannot exceed the values defined by GoCardless and this is affected by the payment interval. WPdirectdebit will validate the number entered.
Date of first payment
You can allow the user the freedom to select a date in the future for their first payment. In the feed settings, set Date of first payment to Map Field and then map the date of first payment to a date field on the form.

If the chosen date is too soon, or if the date falls on a day that is invalid for payments to be taken, the date that will be applied will be the earliest date possible for the first payment to be taken.
Payment day of the month and Payment month
Payment day of the month has meaning only when Recurring is monthly or yearly. The values are Next available, 1-28, or Last day of the month which is the only valid option for days 29, 30 and 31.
Please note: if Recurring is yearly and Payment month is Next available, the Payment day of the month must also be Next available. But if a payment month is selected, Next available is not a valid option for Payment day of the month.
To put that into context, if your payments are to be taken annually, you can specify the date e.g. July 1st. You cannot request ‘July, any date in July will do’. You can, however, request annual payments, to be taken on the next available date, i.e. as soon as possible.
Payment month is used only when Recurring is set to Year in conjunction with Payment day of the month. If Payment day of the month is Next available, this value should also be Next available.

Password
Password verification is for use where you allow customers to have their own user accounts on your website. It adds a double layer of security to your form. Firstly the customer will need to be logged in; secondly the customer will not be able to submit the form if the password entered does not match their account password. You can add a password field by looking in the Advanced fields group offered by Gravity Forms. This will ensure the entered value is only used for verification and is not saved with the form.
If you include a password field, it should be set to Required. Set Confirm Password to Off. Set Enable Password Visibility Toggle to Enable. Do not Enable Password Strength.

To use this password field, you should map it in the Validation section of the feed.

Metadata
GoCardless allows you to tag a transaction with up to 3 items of metadata, consisting of a key and value pair. WPdirectdebit uses one of these pairs to add an order number to the transaction. (The order number is derived from the form’s entry ID and can be customised.)
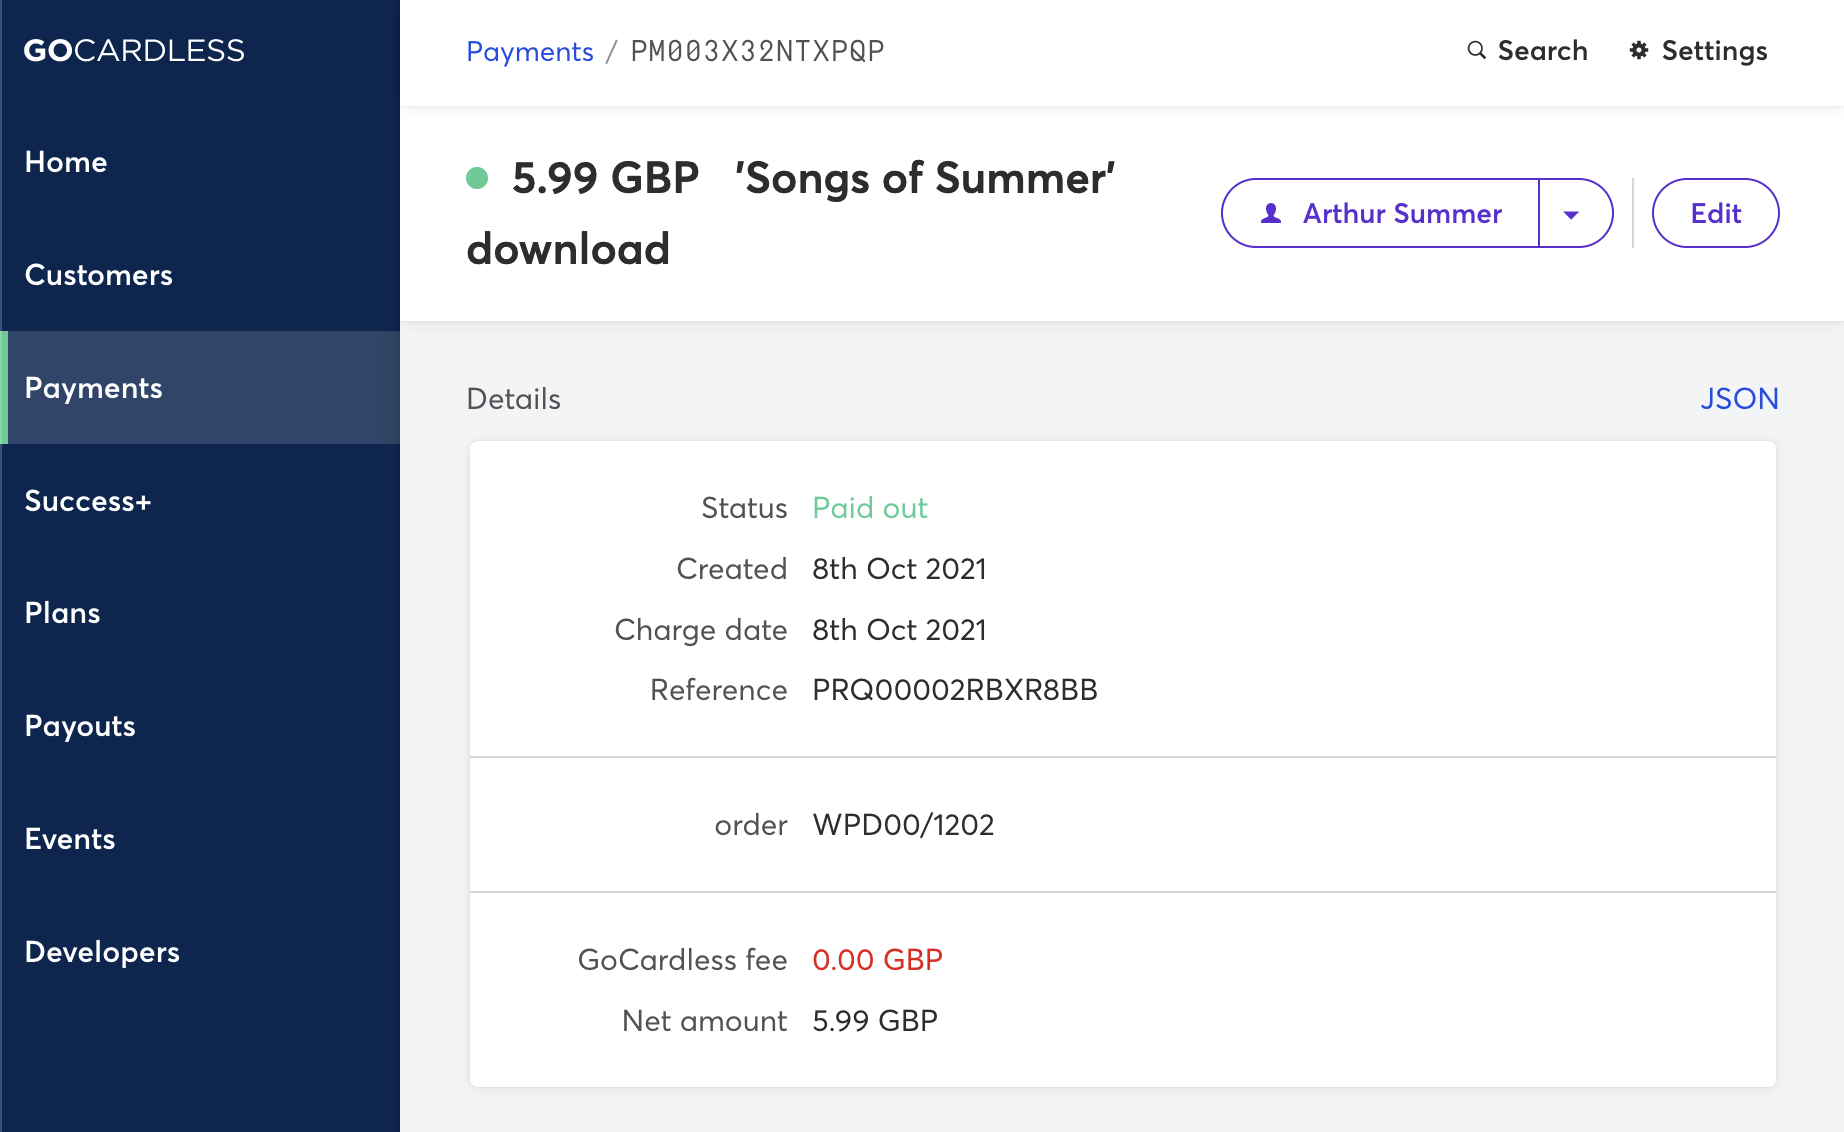
The order metadata (WPD00/1202 in this example) has been added to this payment by WPdirectdebit. Other metadata, if configured on the form’s feed, would appear below.
You can add another pair by entering the metadata key on the form feed and mapping it to a value entered on the form, or selecting from several available values in the drop-down, such as the IP address of the user, or time of day etc.

Pre-populating the GoCardless hosted payment pages
GoCardless needs a Direct Debit mandate in place before the payment can be taken. The first time that a customer makes a payment, they will need to complete a short mandate application on a form hosted by GoCardless. The exact details captured vary from scheme to scheme. For BACS, the customer must provide their name, address and email address, and their bank details.

The customer will be directed to this secure form on submission of the single payment form. Once the secure form has been submitted, GoCardless will redirect the customer back to your website. As the merchant, you do not have to worry about securely storing the customer’s bank details on your system. You never have access to them. On the other hand, you may wish to store their name, address and email and so you may wish to add fields to your form to request these details. So that the customer does not have to enter the same information twice, WPdirectdebit can pre-populate the mandate application. To achieve this, you just need to map those fields on your form to the fields in the mandate section of the form’s feed. Gravity Forms provides suitable name, address and email fields in the Advance Fields section.

Scheme
You can restrict the scheme that customers can use to a single scheme, if you don’t wish to accept payments from all of the available banking schemes (BACS, ACH, SEPA, etc.) The default is to accept any scheme. See the Mandate section above. You cannot set the scheme via a field on the form.
Mandate Metadata
GoCardless allows you to tag a transaction with up to 3 items of metadata, consisting of a key and value pair. WPdirectdebit uses one of these pairs to add an order number to the transaction. You can associate a mandate with its own metadata. Add a metadata key/value pair by entering the metadata key in the mandate section of the form feed and mapping it to a value entered on the form, or selecting from several available values in the drop-down, such as the IP address of the user, or time of day etc.
Account Holder Username
If you choose to allow users to register an account on your site, then you can add suitable account holder fields to your form to capture the user’s data.
Add a single-line text field for the username. You have two alternatives to a username field. You can map any email field on the form to the Account Holder username in the registration settings, or you can use the customer ID generated by GoCardless.
Account Holder Email
If you choose to allow users to register an account on your site, then you will need to capture the user’s email address. Add an email field to your form for this purpose and map it to the Account Holder Email in the registrations settings.
Account Holder First Name and Last Name
If you choose to allow users to register an account on your site, then you will need to capture the user’s name. Add a Name field to your form for this purpose and map the First Name and Last Name to the Account Holder First Name and Last Name fields in the registrations settings.
Terms and conditions
It is always a good idea to get a record of the customer accepting your terms and conditions before you take their money. The Gravity Forms Consent field allows you to offer a “yes/no” consent checkbox and a detailed description of what is being consented to. It is available under the Advanced Fields section within the form editor.

By default, the form will be passed to WPdirectdebit for processing, and from there, over to GoCardless, however you can disable this using conditional logic. For example, perhaps you also offer payment by credit card or by PayPal. By adding a payment method field to your form, the user can select their preferred payment method. With conditional logic you can test this field to find out which method they prefer and then disable all but the selected method. This avoids the possibility of them paying more than once.
The WordPress general settings include an option to disable registrations, and also an option to select the default role for new accounts as shown here:

These options are ignored by WPdirectdebit – you can still register accounts even without this Membership option being checked, and the role assigned to users created by WPdirectdebit will be governed by the WPdirectdebit account settings.
You can disable registrations from any WPdirectdebit form via the Gravity Forms Settings. In the Gravity Forms main menu, select Forms, then select GoCardless and scroll down to the New Accounts settings. Uncheck ‘Enable new account creation’ and save the settings.

If you only want some forms to be able to register accounts, first make sure you’ve not disabled registrations as just described. Then look under the form feed settings for each of these forms. Scroll down to ‘Registration’ and check ‘Enable registrations’.

Complete the remaining fields to suit your needs and save your settings.
An example recurring payment form

Our example form accepts a donation of a user-defined amount. The donor can choose the date for the first payment.
There are name, address and email fields which are used to pre-populate the GoCardless hosted payment pages if a direct debit mandate needs to be set up because no customer account can be found.
An account will be set up for the customer to simplify repeat donations. The username will be the customer ID returned by GoCardless.

Setting up the form feed
Gravity Forms passes the form entries over to each of the active feeds for the form. WPdirectdebit processes the data and passes it to GoCardless. This is the purpose of the feed. Read more about Gravity Forms feeds.

Confirmation settings
It’s important to define the confirmation settings, as GoCardless will need the URL of a page on your website to redirect the customer back to after completing the GoCardless hosted payment pages. You should set up a thank-you page landing page where you can tell the customer what to expect now that their payment has been submitted, and then select this page in the confirmation settings.

Notifications
Notifications are not essential but recommended. These are emails that are automatically sent when selected events occur related to form submissions.
The default notification is to send an email to the site admininstrator. You’ll probably want to add a notification for the customer to remind them what they have agreed to, and here you can add any other information that you’d like the customer to know at this stage: your returns policy, customer service contact details etc.

Adding the form to your site
Gravity forms are embedded using shortcodes like this:
[gravityform id="67" title="true" description="true"]
Refer to the Gravity Forms documentation for more information.